
How to Install PalmSHIELD Commercial Swing Gates
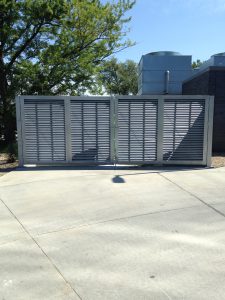
PalmSHIELD prides ourselves on having a reputation of being the most user-friendly architectural screen commercial gate manufacturer. We have been working directly with installers for over a decade to improve our gate installation process. PalmSHIELD is the nation’s largest manufacturer of architectural screen fencing and wall and louvered infill commercial swing gates.
At the onset of your commercial gate installation, you can look forward to:
- Our hinges are pre-mounted to the gate frames. The remaining half is packaged to be field welded to the steel gate post. You may request that we fully install your hinges if you are sure of site conditions.
- Our drop rods are all pre-mounted to the gate frames.
- Our internal locking devices are all pre-installed on the gate frames.
- If requested, our panic hardware and gate closures will be pre-mounted.
- You will receive a gate layout drawing that shows the installed gate elevation view.
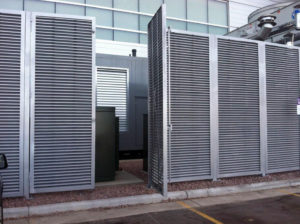
We are your architectural screen fencing and wall and mechanical louvered equipment screen provider.
Important items to review at the start of the commercial gate installation
- Every PalmSHIELD commercial gate is based on a drawing. This drawing is the basis for your installation. Please follow this drawing.
- Unless stated otherwise on your fabrication drawing, PalmSHIELD systems are to be installed level. As most systems are installed outdoors, most exterior paving is not level. If your surface is not level, you will need to verify and plan accordingly.
- Review the swing of your gate. Will it interfere with any other surface like raised equipment pads and curbing?
Commercial gate hardware included with a PalmSHIELD system
- Ball bearing. These are packaged separately. One ball bearing per hinge.
- Drop rods. These are pre-installed on the gates.
- Locking devices. These are pre-installed on the gates.
- Hinges. Half of the hinge is pre-installed on the gate post. The other half is packaged to be field welded unless instructed otherwise.
- Oil. This oil is to be placed on the tip of each sheet metal screw.
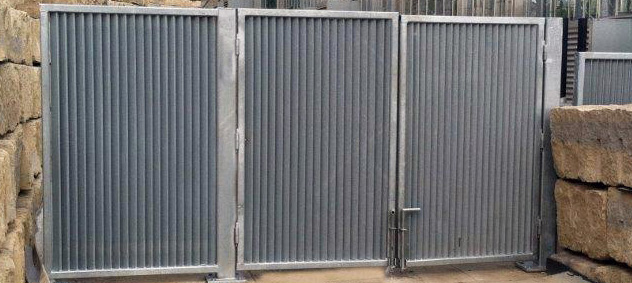
PalmSHIELD is the ultimate architectural screen fencing and wall swing and slide gate manufacturer.
Commercial gate hardware not included
- Post anchors are not included. Based on 4000 psi concrete, you may consider 5/8” x 6” epoxy anchors or 5/8” x 5 ½” wedge anchors. PalmSHIELD is not responsible for determining anchor type or installations. This should be determined by qualified individual based on site conditions.
- Padlocks for locking devices.
Commercial Gate Pre-Installation Preparation
- Using some form of marking chalk or tape, layout your gate in accordance with your included fabrication drawings. If you do not have these drawings, please inquire with PalmSHIELD for a copy.
- Layout each post based on the inside to inside of gate opening dimensions stated on the drawing.
- Mark-out the full swing of the gate in the full closed to full open position.
- Verify the swinging gate does not impact other objects or interfere with access requirements.
- If concerned about changing elevations, identify the highest elevation impacted by the full swing of your gate against the gate post spot elevation.
- Verify if the change in this elevation is greater than the gap shown on the drawing from the bottom of the gate to top of surface.
- If greater, the gate will bottom-out before fully opening.
- Regardless if the gate bottoms-out or not, you may want to raise the gate to maintain the gap.
- If a double drive, you will have to raise both gates equally so the locking mechanism still aligns.
- If a single swing, you will have to raise the latch post equally so the locking mechanism still aligns.
- Verify your commercial gate panels and gate posts compared to your fabrication drawings to assure every panel and posts was accurately fabricated. If you identify an error, please contact us as soon as possible and prior to any installation. PalmSHIELD will be responsible for fabrication errors but not installation costs as a result of these errors.
Commercial Gate Installation Steps
- Using the gate post base plate template provided with your order,
- Use the template to align the gate post to your site markings.
- Make sure the gate post base plate runs parallel to the gate in the closed position. In other words, it is not twisted.
- Mark the center of the anchor holes for gate posts.
- Set your anchors.
- Set your gate posts. Make sure your post is plumb in all directions.
- Once you have determined the elevation of your gate, align the remaining half of the bottom gate hinge to the post. Align the gate hinge so the back of the barrel where it meets the plate is 3/8” in front of the post. In other words, there is a 3/8”gap between the barrel and the gate post.
- Grind away any coatings that will interfere with welding the gate posts and hinges.
- Clamp your hinge to the post. Make sure the hinge is plumb.
- Clean and touch-up the welds with the included matching touch-up paint.
- Hang the gate on the bottom hinge.
- Block the gate in the closed position so that it is level and true. Mark the location of the top hinge and attach accordingly.
- Make sure your gate does not interfere with any site conditions.
- Close the gate to the appropriate closed location. Lower the drop rod and mark the socket location. Repeat for the open position if necessary. For drop rod sockets, we recommend a 1 ½” hammer drill or core bit. You may have to trim the drop rod.
- The internal locking device should not require any further installation. The keys are located in the hardware package.
- PalmSHIELD includes touch-up paint. Closely inspect your installation for any chips or scratches. Hold the can 6” to 8” from the area to be painted and sweep across it until entirely covered. The paint will blend with the powder coated surface.
Select PalmSHIELD for all of your architectural screen and mechanical screen fencing equipment solution.
Required Commercial Gate Tools
- At least six bar clamps with minimum of six inch jaw.
- Socket set
- Set of open end wrenches
- 1” universal joint (knuckled socket).
- Screw gun with clutch adjustment.
- Hammer drill bits for anchors. To be determined by contractor.
- 1 ½” hammer drill or core bit for drop rods (if required).
- Hammer drill bits.
- Level
- Marking tape or paint
- String line.
- Rubber mallet
- Welder (if required for gate installations on steel posts)